Strawberry plants winter
How to Winterize Strawberry Plants
Strawberries, Fragaria × ananassa, are low-profile, fruit-bearing perennials suited to cultivation in USDA Hardiness Zones 3 to 10.
Sometimes considered a challenging crop, folks in cold regions with freezing winters often grow plants as annuals and discard them at season’s end.
However, when you select the hardiest cultivars, and provide a little pre-winter TLC, your favorite berry-makers can yield sweet and tasty treats year after year.
We link to vendors to help you find relevant products. If you buy from one of our links, we may earn a commission.
In our comprehensive guide to growing strawberries, we cover all you need to know to plant, care for, and harvest strawberries.
In this article, we focus on a few easy steps to take to winterize plants so they return with vigor each spring.
Here’s the lineup:
What You’ll Learn
- Why Winterize?
- Four Easy Steps
- Renovate Your Plants
- Fertilize
- Water
- Apply Mulch
There’s a chill in the air. Let’s get started!
Why Winterize?
Most types of strawberry require 200-300 chill hours with temperatures between 45 and 32°F for optimal fruit production.
However, according to Emily Hoover, extension horticulturalist at the University of Minnesota Extension, temperatures of 15°F or below can cause fatal damage to the crown.
If you live in a region where the ground freezes in winter, your strawberries will benefit from a few proactive measures to help them survive the coldest months of the year.
There are four reasons why:
- To avoid damage to next spring’s buds.
- To minimize root damage from temperature fluctuations caused by repeated cycles of freezing and thawing.
- To inhibit “heaving,” a spontaneous uprooting caused by soil shifts during freezing and thawing.
- To retain the moisture needed to keep crowns – the part of the plant where the stems originate – from drying out.
With a bit of preparation, you can protect your plants from the ravages of winter and set them up for a healthy return after their period of dormancy.
Container-grown plants can be prepared using the same methods described below and then placed in a basement, shed, or garage to winter over.
Four Easy Steps
The four steps to prepare strawberries for winter are: renovate, fertilize, water, and apply mulch.
Let’s look at each step in more detail:
1. Renovate Your Plants
There are three types of strawberry plant:
- June-Bearing varieties that form buds in the fall, bloom in spring, and produce one large harvest, typically in June.
- Everbearing varieties that form buds when the days are long, and produce three harvests each year.
- Day-neutral types that will flower and produce fruits throughout the growing season provided temperatures don’t go lower than 35°F or over 85°F.
After harvesting fruit, plants that are expected to winter over need to be renovated. This process consists of pruning foliage, thinning, and removing debris and weeds.
For June-bearing varieties, you’ll need to prune the foliage to a height of one to two inches above the crown. You can do this with pruning shears or hedge clippers.
If you have a large flat strawberry patch, you can also use a lawn mower with the blade set to the appropriate height, but be sure to mow no more than one week after the last harvest or you risk damaging the new leaves.
Thin plants that have spread and matted together to rows eight to 12 inches wide, with two to three feet between them.
Remove runners as needed to contain your plants to their target width. You may use a tiller for this task.
If they are not growing in rows, thin them to five per square foot, or about four to six inches apart.
Discard all those that have been weakened by adverse weather conditions, disease, or infestation by pests.
Remove any weeds and debris.
For everbearing and day-neutral varieties, prune off any leaves that appear damaged, diseased, or pest-infested. Remove entire plants if necessary.
Thin those remaining to five per square foot, or about four to six inches apart.
Remove runners to prevent the growth of new plants and remove any weeds and debris.
Be sure to discard diseased and pest-infested foliage in the trash, not on the compost heap.
2. Fertilize
Outreach Horticulturist Richard Jauron from the Department of Horticulture at the Iowa University Extension recommends the application of a balanced, 10-10-10 (NPK) fertilizer at a quantity of five pounds per 100 feet of row, or one pound per 25 plants at least one month before your average first frost date.
Take care to avoid direct contact with foliage, apply granular fertilizer or pellets between plants in beds and containers, and in the aisles between the rows. Water in well.
3. Water
After you have renovated your plants, continue to water right up until first frost. Provide one inch of supplemental water per week in the absence of rain.
During the cold months, while they are dormant, there is no need to provide supplemental irrigation for those growing in the garden.
Container-grown plants placed in a cold shed or garage will require minimal water, just enough to prevent the soil from drying out completely.
4. Apply Mulch
Mulch is the final step toward winter readiness. An application of mulch provides a layer of insulation that is especially important in regions with little to none of nature’s own insulation: snow.
Photo via Alamy.Covering plants not only helps to keep them uniformly cold during temperature fluctuations, it aids in retaining the moisture essential to crown health, while also promoting optimal drainage.
Timing
The application of mulch is not something to be rushed for three reasons:
- Laying it too soon may raise the ground temperature and promote new growth.
- It may trap excessive moisture that can rot crowns.
- It may attract mice and other rodents that are still actively seeking winter shelter.
The best time to apply mulch is between late November and early December, after first frost when much of the foliage is brown and floppy, and before temperatures drop below 20°F.
As mentioned earlier, at 15°F, plants not covered by mulch or snow are susceptible to fatal crown damage.
Application
Choose a mulching material that is loose to avoid matting, facilitate air circulation, and aid in drainage.
Straw or pine needles are excellent choices. Avoid leaves and grass, as they are likely to mat, as well as hay, because it tends to be full of weed seeds.
Photo via Alamy.To apply mulch, drop it around and over the plants by loose handfuls. The pieces of straw or pine needles should separate as they fall, creating airy heaps, rather than tight clumps.
Completely bury all visible foliage beneath a continuous cover of mulch, all the way down the rows, or to the edges of the beds, raised beds, or containers.
For those growing in the garden, the pros at Iowa State University Extension and Outreach recommend an application of three to five inches of mulch.
They recommend six to eight inches in raised beds, especially pyramid planters, because the soil temperature becomes even colder than ground soil.
Some folks prefer to lay mulch when rain is in the forecast, to help hold it in place.
If you’re in an especially windy locale, you may want to anchor the mulch in your rows and beds with chicken wire. You can use bricks, rocks, or stakes to hold the chicken wire in place.
Regardless of when you lay it, or if you anchor it, mulch will compact over time and you may need to make additional applications during the winter months.
If you are growing your strawberries in barrels or pots, you can move them into storage in a cold shed or unheated basement or garage. Wrap the containers loosely in burlap, and fill the sides and top with six to eight inches of straw.
Berry On
That’s all there is to it. To recap, there are four steps to take to prepare your strawberries for winter’s onslaught:
- Renovate after harvesting.
- Fertilize with a balanced product.
- Water an inch per week until first frost.
- Apply mulch liberally and loosely after first frost.

And then, one dry day in early spring, after the winter winds have ceased to howl and the snow has finally melted, gently pull back the mulch.
If you see green shoots, it’s time to remove the mulch and let them bask in the sunshine. If not, try again soon.
What should you do with the mulch?
Rake it into the aisles between rows, to soak up spring rain and make walking less muddy. Leave some tucked around the sprouts to inhibit weeds, aid in moisture retention, and keep future berries up off the dirt.
Keeping mulch near is also handy when a late-season frost threatens, for short-term protection in a pinch.
We hope that winterization is soon a routine part of strawberry care in your garden, so you can weather the cold months with confidence, and berry on!
Have you successfully overwintered your strawberry plants? Share your tips in the comments section below.
And for more information about growing strawberries, check out these guides next:
- 35 of the Best Strawberry Varieties for Home Gardeners
- How to Control Gray Mold (Botrytis Rot) on Strawberries
© Ask the Experts, LLC. ALL RIGHTS RESERVED. See our TOS for more details. Uncredited photos: Shutterstock.
Winterizing Strawberry Plants – Strawberry Plants
Winterizing strawberry plants is necessary for gardeners in many areas. As the temperatures drop each year, people write in asking when and how to winterize strawberry plants. This post will cover the basics and help you determine how and when to protect your strawberry plants as the weather cools.
Jump to:- Why Winterize Strawberries?
- When Is the Right Time to Winterize Strawberry Plants?
- How to Winterize Strawberry Plants in the Ground
- How to Winterize Potted Strawberry Plants
- Winterizing Strawberries: Conclusion
Why Winterize Strawberries?
Strawberry plants are perennial. They produce for many years after the initial planting, and they can thrive for very long periods if a rotation is used to keep plants fresh. But, there is a problem with perennial plants. How do they survive the freezing temperatures of the winter months? Well, strawberries are classified as forbs. Consequently, they don’t have the thick bark that protects many other perennials like most trees. If they don’t get extra protection (at least in the colder Zones), they will either die or suffer cold injury. Both death and injury can significantly hamper your plants’ ability to grow strawberries for you!
Simply put, you need to winterize strawberries to keep them alive and well.
When Is the Right Time to Winterize Strawberry Plants?
Strawberry plants should be winterized when they have entered dormancy and the temperature threatens to get cold enough to damage them. The time when strawberry plants go dormant varies. It depends upon the temperature and daylight in your location. As the days shorten in the fall, strawberry plants begin to march toward dormancy. Yet, it isn’t until the temperatures drop well below freezing for several nights in a row that the plants will actually begin their slumber.
For USDA Hardiness Zones 5 or lower (4, 3, etc.), plants will often enter dormancy by the end of November. For Zones 6 through 8, the plants will usually go dormant in December. You know the plants have gone dormant when you have a combination of cold temperatures and plants with dead-looking, wilted vegetation. If winterizing strawberry plants in mild winters, they will often live without any mulch or special winter care in Zones 7 and higher (8, 9).
How to Winterize Strawberry Plants in the Ground
First, ensure that the plants are truly dormant by checking the crowns to make certain there is no active new growth growing. Then, gently remove all the dead and wilted leaflets by carefully raking them out of your strawberry patch. Next, clear any accumulated leaves or debris from the strawberry beds. Finally, place a thick layer of a suitable mulch over the strawberry plants. The lower your USDA Hardiness Zone, the higher you need to pile the mulch. Any material that allows water to drain and air to circulate is an acceptable mulch. The most common, of course, is clean straw. Pine needles is also a good choice. Hay can be used, but it isn’t the best option. Hay almost always has loads of grass seeds and other weed seeds that will find a happy home alongside your strawberries making much more work for you when spring comes. Mulches that compact tightly or do not allow airflow are not appropriate for winterizing strawberry plants. Leaves, for example, will trap moisture. Wet, clumpy mulches will harbor pathogenic fungi and bacteria that can damage or kill or your strawberry plants, if they aren’t suffocated outright by a compressed mulch mat.
How to Winterize Potted Strawberry Plants
Potted strawberry plants are a little bit more difficult to care for because they are a little bit more vulnerable than in-ground plants. The soil in pots is quicker to freeze than the better-insulated soil of Terra Firma. Winterizing strawberry plants in containers can be done several ways, depending on how much effort you wish to expend.
Winterize Potted Strawberries in the Ground
If the ground isn’t already frozen when you decide to prepare your plants for winter (it should not be!), you can overwinter your strawberry plants in the ground.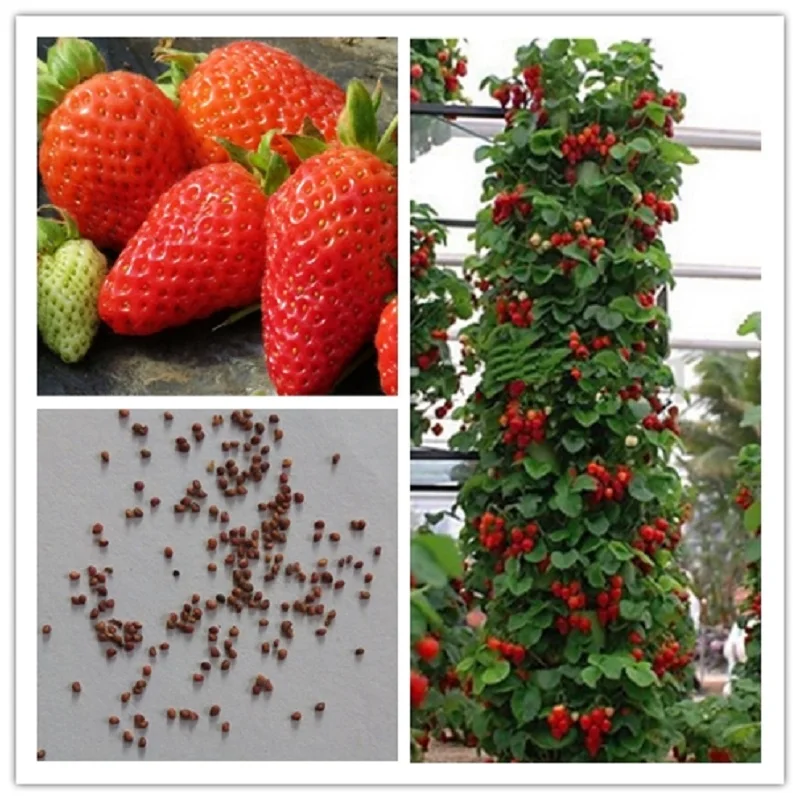 If you have a spare area, simply dig pot-sized holes and place the pots containing your dormant strawberry plants in them. Pack the dirt down around the sides of the pot tightly to simulate a natural planting and provide insulation. Then, mulch them just like you would if they were actually in-ground plantings. In the spring after the danger of cold injury has past, pull the pots up, wipe them off, and re-place or re-hang them in their designated places. If this method is too much work or is impossible…
Use Ambient Heat to Protect Potted Strawberry Plants
If your home is situated so that it has a side sheltered from the harshest winter weather, utilize it to help protect your strawberries. Homes are not perfectly insulated. If you heat your home, a lot of that heat is going to be lost through the walls during the winter. Placing your strawberry plants in containers along the wall of your home on the most sheltered side can keep them happy all winter in milder Zones. It is a good idea to mulch these plants as well. This is one of the easier ways to go about winterizing strawberry plants in pots!
Overwinter Strawberry Plants in the Garage
If you have an unheated garage, you can winterize strawberry plants in it as well. You typically don’t have to mulch them in a garage, but you do want to have them against an inner wall (to utilize the ambient heat) if you live in very cold locations. If you don’t, it can actually be best to keep them by an outer, unheated wall as long as the temperature inside the garage doesn’t get much below the upper 20s.
Strawberry plants require water over the winter, however. So, be sure to check the soil moisture levels. If the soil drys completely out, the plants will die. If the soil stays soggy, they will probably die as well. Water just enough each week to keep the soil slightly damp. An easy way to achieve an appropriate level of moisture is to place a handful of snow (if available) on each potted strawberry plant once a week. The snow gradually melts and keeps the soil moist, but not soggy.
Winterizing Strawberry Plants in Non-Standard Containers
Most people plant strawberries in pots. But, lots of people use other methods as well. Strawberry pyramids and tires and cinder block plantings can generally be treated like plants in the ground (just mulch a bit extra due to the greater surface area exposed to wind). Overwintering strawberry towers or winterizing strawberry plants planted in gutters or pipe systems is more difficult. If the strawberry towers or gutters/pipes can be moved into the garage or other similar shelter, they will often do better than if left suspended above the ground and exposed to all the harshest weather winter can throw at them. If that isn’t possible, one option is to wrap the containers in an insulating-yet-breathable material (like burlap) after dormancy has arrived. Several layers will need to be applied to offer sufficient protection, so it is also necessary to check the soil to ensure it remains moist. That may involve unwrapping and re-wrapping several times during the winter (which is a frozen pain in the fingers). But, if you live in colder Zones, it has to be done if you want happy and productive plants in the spring.
Winterizing Strawberries: Conclusion
Regardless of how you accomplish the task, most people will have to protect their strawberries in some way over the winter months. Cold injury is particularly problematic for strawberry plants since they produce fruit by means of perennating buds. In short, the flowers that become strawberries aren’t formed in the spring. They get their start during the waning warm days of the previous year in the form of flower buds in the crown of the strawberry plant. If strawberry plants have poor care or nutrition during the end of August, September, and October, they won’t form many buds. If the plants suffer cold injury, the buds are be damaged. When the buds are damaged by the winter weather, no flowers are produced when spring rolls around. And everyone knows that no flowers means no strawberries.
So, pay attention to your plants in the fall. And, protect them through the winter by appropriately winterizing strawberry plants. Then, when spring arrives, you’ll be harvesting heaps of delightful and delicious strawberries! If you want to see more, follow up with: Strawberry Flowers and Overwintering Strawberries. Good luck!
Learn more:
Growing Strawberries in Cold Weather
Fall Strawberry Plants
Strawberry Plants and Cold Injury
Learn everything about growing strawberries from the Strawberry Master Manual, also don't forget to follow me on Pinterest and Facebook to stay updated with everything I post. We also have a Strawberry gardening group on Facebook! Feel free to join.
Preparing strawberries for winter: how to protect a berry plantation from frost
The last few days are before frost. It's time for the plants to rest and gain strength during the winter sleep for the next summer, sun and harvest.
But in order to keep strawberry bushes healthy and strong until spring, they need to be properly prepared for wintering. How to do it right - read our article.
How to prepare strawberries for winter
There is one obligatory rule - you can prepare berry bushes for winter only after flowers and berry ovaries stop appearing on them. For better preservation of the bushes in winter, it is necessary to carry out a set of works on pruning the leaves of strawberries or strawberries, carrying out autumn dressings with special compounds and arranging a winter shelter directly. nine0003
Should strawberries be pruned in autumn
Experts argue whether it's better to cut leaves from strawberry bushes in winter or not. There are quite a few reasons to make a “haircut” in autumn:
- Strawberry pests often hibernate in old leaves.
- Leaves - a place of accumulation of pathogens of infectious diseases.
- In contact with moist soil, the leaves quickly rot, becoming a dangerous factor in infecting the whole plant with rot. nine0018
- Plants with minimal leaves are easier to cover and mulch.

Along with this, there are good reasons not to prune strawberry bushes:
- Pruning the leaves leaves a lot of wounds, especially when removing a lot of green mass. Wound surfaces serve as entry gates for infections.
- With a cardinal removal of leaves, the strawberry bush is under severe stress, and this is not at all good when preparing for winter. In addition, the plant will try to recover urgently and will begin to spend the last of its strength on growing new foliage. nine0018
- If the leaves are not carefully removed, the heart of the bush is often damaged, such a plant may die in the winter.
We believe that the best option is a partial pruning of strawberries, when the oldest and most damaged leaves are removed. It is not necessary to manually tear them off the bush; it is best to carefully cut the leaf cuttings with sharp scissors or secateurs that do not crumple the leaf tissue.
Diseased leaves are burned, otherwise an infectious focus may appear on the berry plantation next year. If the leaves are healthy, put them in the compost. nine0003
If rooted whiskers remain near the bushes, then you can not remove young plants from the garden until spring. When winter passes, they are transplanted to a new place or replaced with young growth of old, overgrown bushes. Overwintered rooted rosettes are more resistant to bad weather, bloom faster and give a full harvest.
Watering before wintering
Strawberry or strawberry bushes should not go into winter sluggish, so the beds are well watered several times before preparing the plants for shelter. Watering is carried out in advance, several times throughout September, depending on the weather. If the beginning of autumn turned out to be rainy, watering is optional. nine0003
Autumn feeding of strawberries increases resistance to frost
A rich harvest depletes berry bushes, so strawberries must be fed with nutrients before wintering. This operation is performed after partial removal of the leaves, using organic fertilizers. Suitable bird and cow manure, ash, compost diluted in water.
- Bird droppings. It is diluted in proportions of 1:10, where 10 is water in liters. An effective fertilizer, it is soaked in water, insisted for 2 days and poured under strawberry bushes, trying not to get on the leaves. It is best not to pour the solution close to the center of the bush, but to water it between rows. nine0018
- Mullein. Diluted in proportions 1:1:10, where 1 - mullein; 1 - charcoal or ash, 10 - water. To prepare the infusion, take rotted mullein and one part of the ash. Insist for 2-3 days, watered with a row-spacing solution.
- Ash. It is applied at the rate of 150 g per 1 m2. You can scatter on the garden bed in a dry form, powdering the plantings.
Fertilized plants endure the winter better, bloom massively in the spring ahead of schedule.
Mulching
In September the beds and row spacings should be mulched. There is no need to do preliminary loosening of the earth now, as this can damage the roots, which will result in unnecessary problems for the wintering plant. You can lightly roll the lower part of the bush with earth, especially if the roots are exposed.
Straw, spruce branches, fallen leaves, corn stalks are best suited for mulching strawberries.
Spread the mulch on the ground, trying to distribute it evenly.
In the northern regions, where the winters are harsh, you can cover the beds with strawberries more carefully. With the onset of frost, voluminous branches are laid on top of the beds and a special agrofiber or lutrasil is rolled out on top. As snow falls, it is raked over the shelter. Under such a "blanket" berry bushes are safe, just do not forget to remove it in early spring, otherwise the plantings may rot. nine0003
Strawberries are not so difficult to care for - simple measures carried out on time will allow you to harvest the richest harvest of tasty and healthy berries next year.
Author: Oksana Artemenko, Garden Expert of the Backer online store
Published: 07 Sep 2020
Views: 32250
(Voting: 1, Rating: 1. 0)
0)
Share with friends:
How to keep strawberry seedlings from autumn to spring: in the refrigerator, basement, on the balcony, under the snow or using the freego technology
- 1 Choice of strawberries for storage
- 2 Methods of storage
- 2.1 refrigerator, cellar, insulated balcony
- 2.2 on a bed under the snow
- 2.3 Frigi strawberries 9018
Planting strawberries in the spring period - this harvest in the first season. But in order to keep the seedlings until spring during the winter cold, some efforts will have to be made.
Selection of strawberries for storage
Mustaches of the mother plant of the first or second order are suitable for propagation. The closer the young sprouts are to the main bush, the more likely they are to overwinter well and take root safely in the spring. Suitable mother plants must be selected and marked early in the season. In mid-July, the formed mustache should be cut off from them and planted nearby.
 By the end of summer, they will have time to grow their own root system and will be ready for wintering. nine0003
 Important! In young plants, all whiskers and peduncles must be removed. All strawberry forces should be directed to rooting.
Storage methods
Preparation for winter storage begins in late August. At this time, it is necessary to reduce watering, and then stop it altogether. As a result, active growth will come to naught and the plant will prepare for hibernation. If at this stage the strawberry bushes began to dry and wither, then watering should be resumed, but not more than once every 10-12 days, so as not to stimulate growth. nine0003
In the second half of September, all young rosettes should be dug up. Remove the soil from the roots and cut off all dry leaves.
Important! If strawberries show signs of wilting, then its roots must be placed in water for several hours and then dried.

Optimal storage conditions for strawberries in winter:
- air temperature - +2 - +6 °С;
- humidity - 90%;
- the content of carbon dioxide in the air is twice that of oxygen. Under ideal conditions, these figures should be 2.5% and 5%; nine0018
- no drafts.
Help! Humidity can be increased by hanging wet towels in the room.
Refrigerator, cellar, insulated balcony
For storage indoors, in the cellar or on the balcony, plants should be inspected, collected in bunches of 3-4 and placed in wooden or plastic boxes with good ventilation. Wet moss should be placed on the bottom of each container. It will help to avoid drying out of the bushes during long storage. Thus, healthy strawberry seedlings can lie up to 10 months without damage. When spring comes, it can be planted both in open and closed ground. nine0003
It is important to monitor the air temperature, it should be in the range of +2 - +6°C.
 With an increase, the bushes will grow, with a decrease, they will suffer from frost. If the storage place is too humid, then it is necessary to arrange regular ventilation, covering the strawberries with a thick cloth from drafts.
 In the garden under the snow
This option is suitable for regions with heavy snow cover and minimum winter temperatures down to -35 degrees.
The preparation phase starts at the end of September. The frequency of watering is reduced and is done only as needed to avoid wilting of the plant. In recent weeks, watering must be completely abandoned. Before the onset of frost, young bushes are covered with a layer of straw, and then with spunbond. After snow falls, a layer of snow cover up to 10 cm thick should be formed on the bed and covered with straw on top. In such conditions, strawberries remain wintering until spring. It is necessary to dismantle the shelter in April after the end of the threat of night frosts. nine0003
Frigo Strawberry
Frigo is not the name of a strawberry variety, but a special technology for storing its seedlings.

This process includes the following steps:
- Mother plants are transplanted into sandy or sandy loam soil in spring. Throughout the vegetative period, flower stalks are removed from them in order for the plant to use all its strength to build up the root system.
- Young plants are transplanted from the mother as they mature. They are regularly fertilized and flower stalks are also cut off. nine0018
- At the beginning of November, when the foliage near the bushes turns brown and the rhizome is uniformly brown, the seedlings are dug out of the bed.
- In a cool room, they are processed: removing the earth from the roots, removing all old leaves. At the same time, the roots of the plant do not wash and do not cut dead parts from them.
- All seedlings are treated with any fungicide and tied in bunches of 50-100 pieces.
- In this form, strawberries are sent for storage. It is necessary to place it only in plastic bags on the bottom shelf of the refrigerator.